
Read time: 5 minutes
Today you’ll learn how to use Docker to deploy your .NET apps.
Docker is incredibly useful for .NET developers, but it can be a bit overwhelming at first.
However, once you start using Docker, you will never want to go back to the old way of deploying your apps. Guaranteed.
So, in this tutorial, I’ll show you how to use Docker to deploy your .NET apps in 4 simple steps.
Let’s get started.
Why use Docker for my .NET apps?
Docker is a tool that allows you to package your application and all its dependencies into a single image that can be deployed anywhere.
It brings in tons of benefits for .NET developers, like:
- Consistency across your environments, so your apps can run the same way on any environment.
- Simplified dependency management, eliminating the need to install the correct OS or .NET dependencies on your server(s).
- Isolation, so your app won’t run into conflicts with other apps running on the same server.
- Scalability, so you can easily scale your app by running multiple instances of it.
- Efficient use of system resources, so you can run multiple apps in the same server without wasting resources.
- Easy deployment, so you can deploy your app in seconds, instead of hours or days.
- Broad cloud provider support, since pretty much all cloud providers support Docker today.
So, if you’re not using Docker yet, you should definitely give it a try.
How to use Docker to deploy my .NET apps?
To start using Docker, you basically need to turn your .NET app into what is known as a Docker image and later run that image as a container in your production environment.
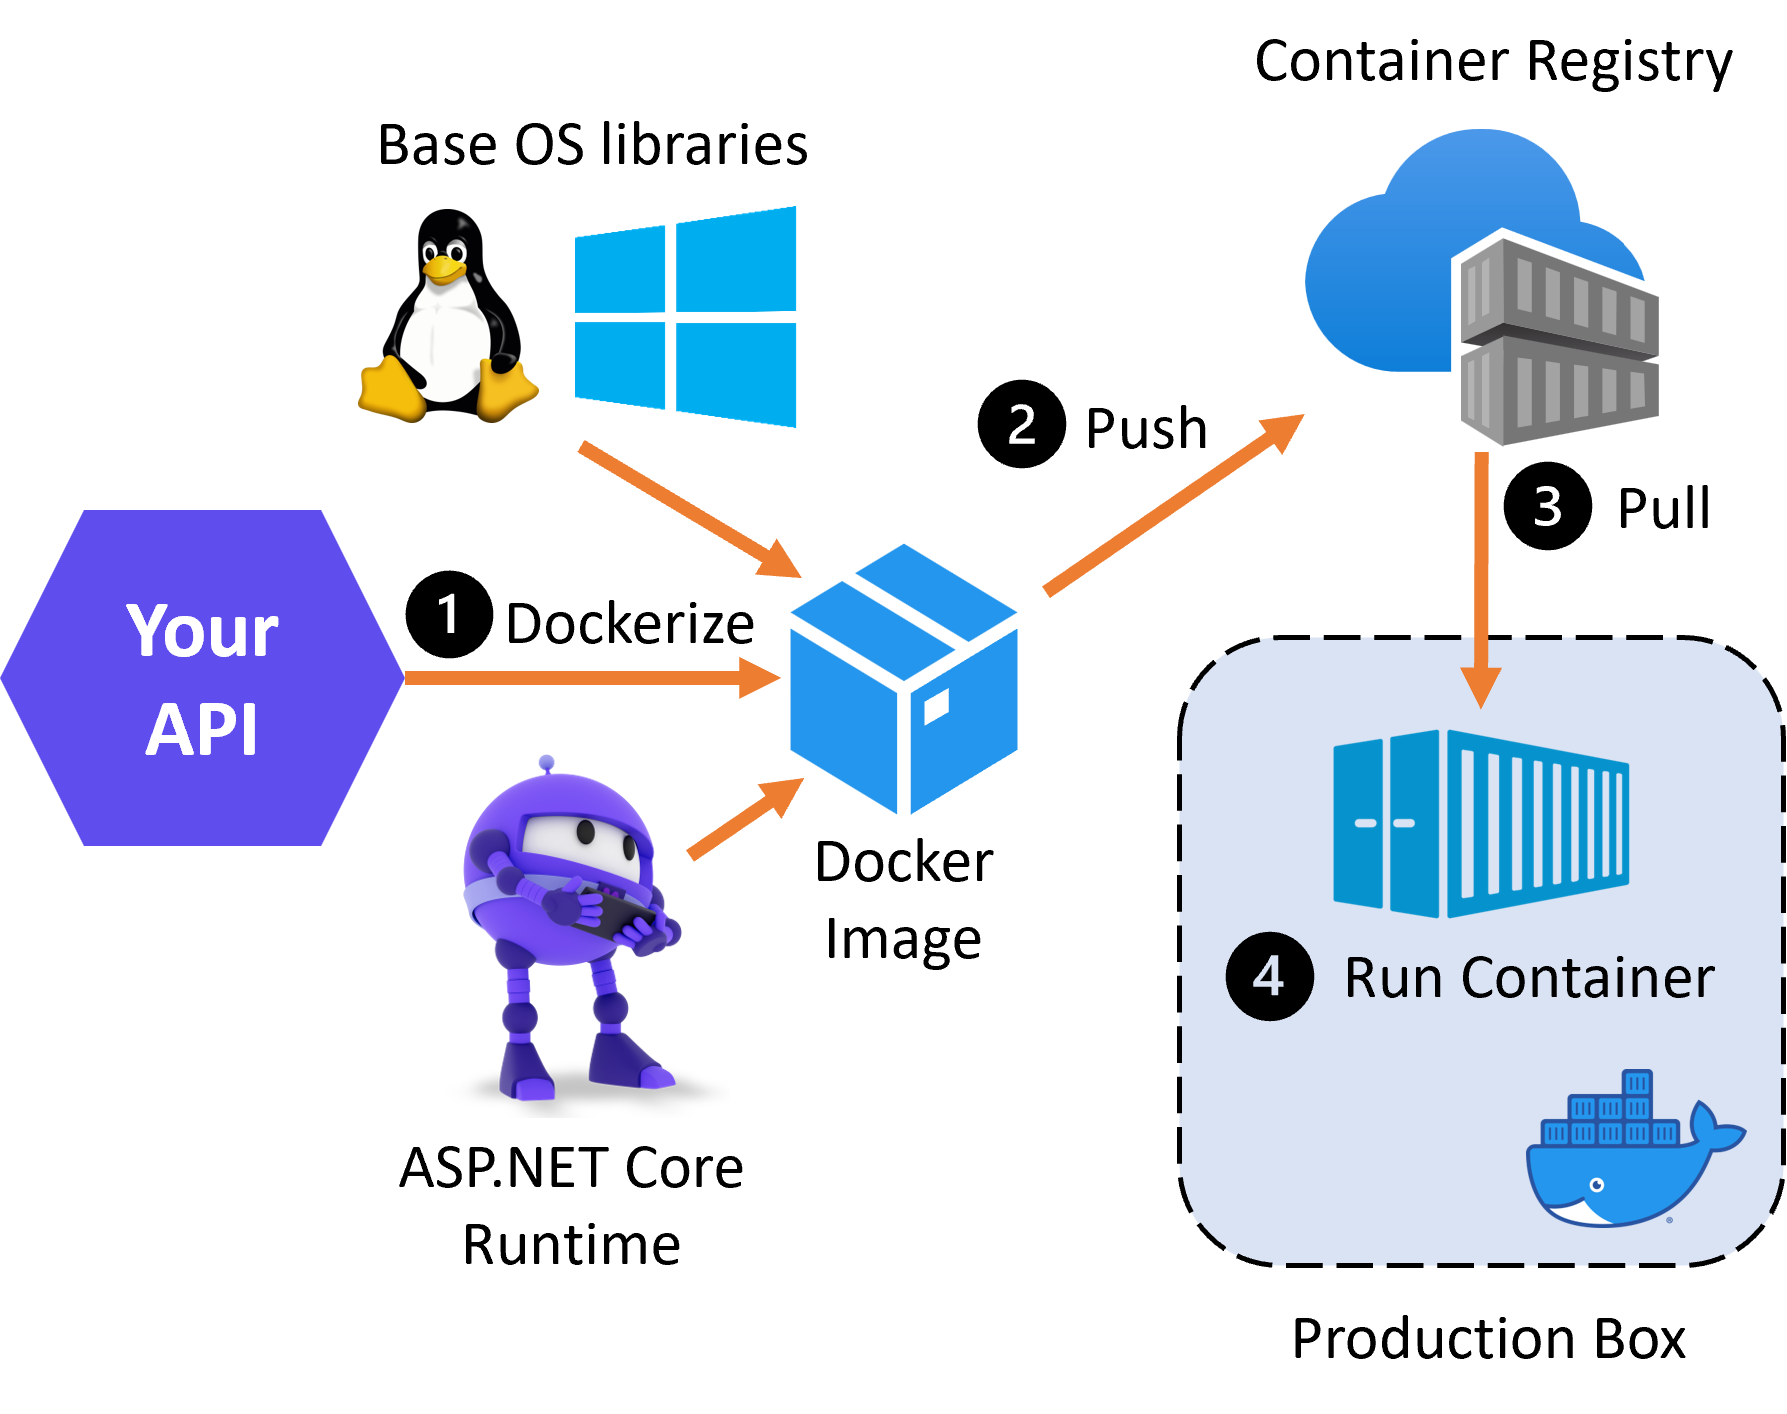
Specifically, here are the overall steps you need to follow:
- Build a Docker image for your .NET app in your box
- Push your Docker image to a Docker registry
- Pull your Docker image into your production box from the Docker registry
- Use your Docker image to run your .NET app as a container in your production box
Let’s go over each of these steps in more detail.
Step 0: Create your .NET app
Skip this step if you already have a .NET app you want to deploy with Docker.
If you don’t have one, you can create the simplest ASP.NET Core API like this:
dotnet new webapi -minimal -n hellodocker
Run it and send a GET request to it:
dotnet run
GET http://localhost:5056/weatherforecast
It will return a list of random weather forecasts (showing only first forecast here for brevity):
HTTP/1.1 200 OK
[
  {
    "date": "2023-08-08",
    "temperatureC": -6,
    "summary": "Hot",
    "temperatureF": 22
  },
  ...
]
Let’s see how to dockerize this simple API.
Step 1: Build a Docker image for your .NET app in your box
To build your Docker image you can either use a Dockerfile or the new Container Building Tools that started shipping with the .NET 7 SDK.
Either way, we are going to need the Docker daemon running in our box. Otherwise, we don’t have a way to run Docker containers.
So, if you don’t have it, please use this link to install Docker Desktop and make sure it’s up and running before doing anything else.
Let’s use the .NET container tools to build our image.
So open your .csproj file and add the EnableSdkContainerSupport property:
<Project Sdk="Microsoft.NET.Sdk.Web">

  <PropertyGroup>
    <TargetFramework>net7.0</TargetFramework>
    <Nullable>enable</Nullable>
    <ImplicitUsings>enable</ImplicitUsings>
    <EnableSdkContainerSupport>true</EnableSdkContainerSupport>
  </PropertyGroup>
  ...
</Project>
Now run the following command in your terminal to build the Docker image:
dotnet publish --os linux -c Release -p:PublishProfile=DefaultContainer
You’ll get something like this:
MSBuild version 17.6.8+c70978d4d for .NET
  Determining projects to restore...
  Restored D:\projects\hellodocker\hellodocker.csproj (in 292 ms).
  hellodocker -> D:\projects\hellodocker\bin\Release\net7.0\linux-x64\hellodocker.dll
  hellodocker -> D:\projects\hellodocker\bin\Release\net7.0\linux-x64\publish\
  Building image 'hellodocker' with tags 1.0.0 on top of base image mcr.microsoft.com:443/dotnet/aspnet:7.0
  Pushed container 'hellodocker:1.0.0' to local daemon
Your docker image is ready! And you can confirm it’s there by running this command:
docker images
Which will show your new image in the list:
REPOSITORY    TAG    IMAGE ID       CREATED         SIZE
hellodocker   1.0.0  a6eae91bdb19   7 minutes ago   216MB
A few things to notice regarding the dotnet publish command we just ran:
- The –os linux parameter tells the tools to use a Linux base image.
- The -c Release parameter tells the tools to build a Release version of our app, ready for prod.
- The -p:PublishProfile=DefaultContainer parameter triggers the actual publishing of our app as a Docker image.
In addition, since ours is an ASP.NET Core app and the TargetFramework is net7.0, the tools inferred that we wanted to use the mcr.microsoft.com/dotnet/aspnet:7.0 base image, which is the official .NET 7 base image for ASP.NET Core apps.
You can do a bunch of other customizations to your Docker images via the .NET Containers tooling. Check out the official docs over here.
Step 2: Push your Docker image to a Docker registry
Now we need to push our Docker image to a container registry, which is a repository for Docker images. This can be a public registry like Docker Hub or a private registry like Azure Container Registry.
I’ll be using an Azure Container Registry (ACR). I won’t be covering how to create one in this tutorial, but you can find a quickstart guide over here
With your registry ready, you’ll have to retag your local Docker image to match the registry name:
docker tag hellodocker:1.0.0 julioc.azurecr.io/hellodocker:1.0.0
And, since Azure Container Registries are private, you have to authenticate first before you can push your Docker image there.
For this, first enable the Admin user in your Azure Container Registry and copy the generated username and password:
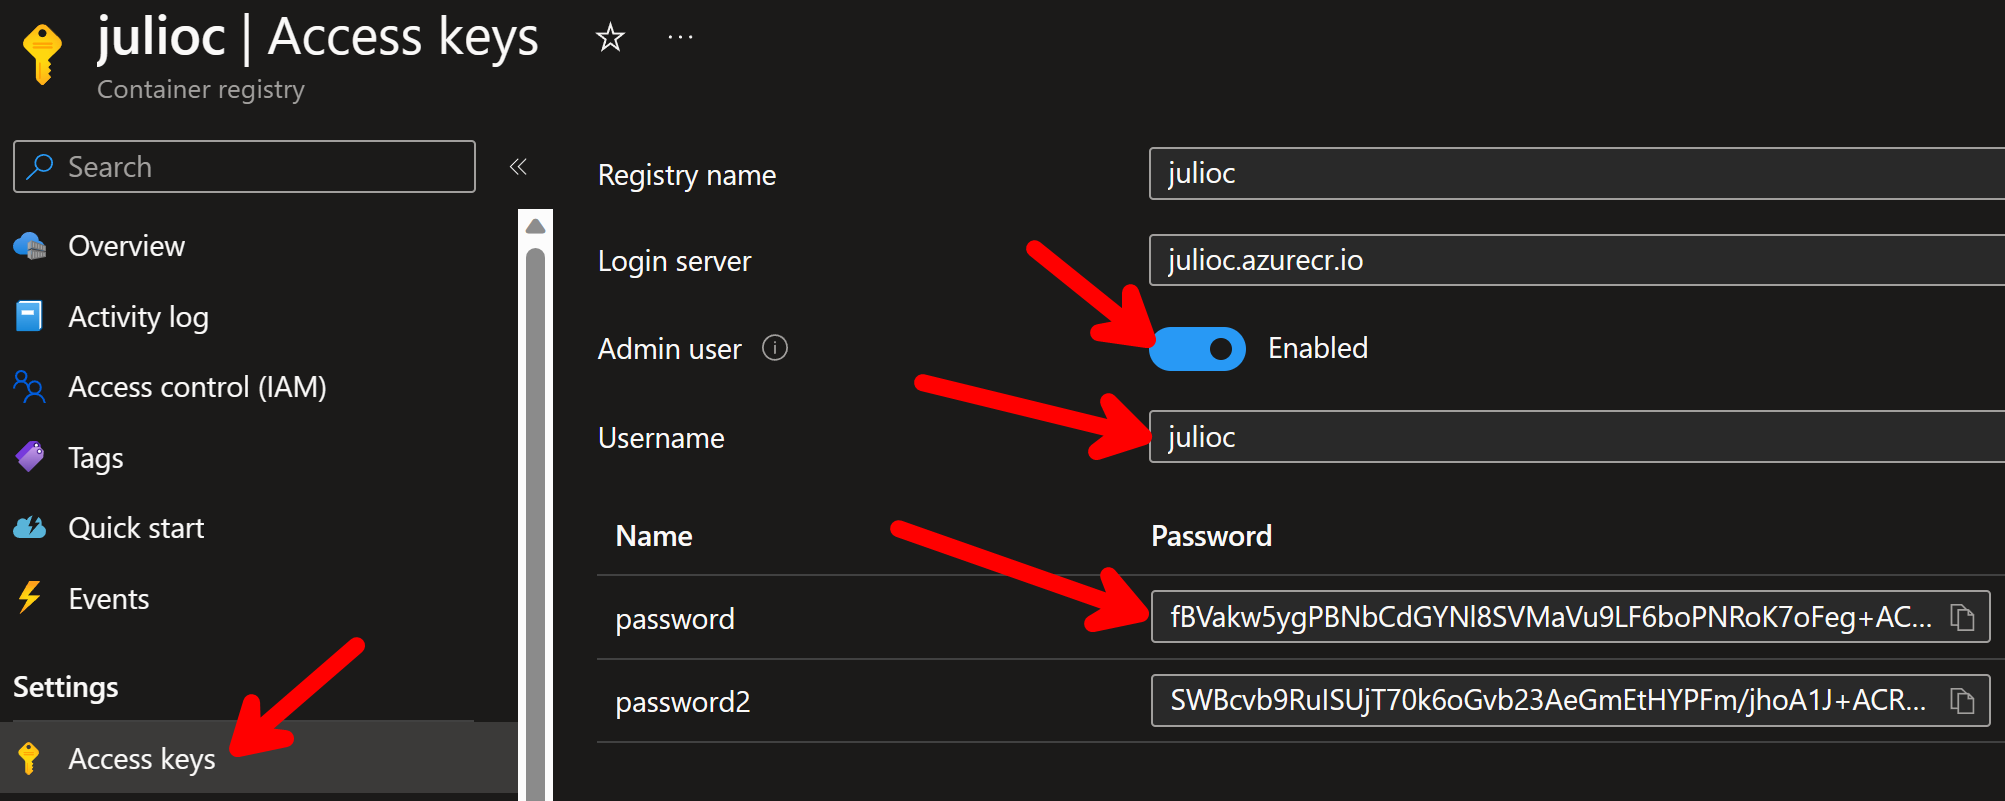
Now you can authenticate to your registry by running this command (use the username and password you copied):
docker login julioc.azurecr.io -u julioc -p fBVakw5ygPBNbCdGYNl8S...
And now you can push your Docker image to your registry like this:
docker push julioc.azurecr.io/hellodocker:1.0.0
After a few seconds (or minutes, depending on your network speed) your image is ready in your registry:

Quick Tip: Next time you make changes to your app you can build, assign a new tag and publish your Docker image to ACR in one shot using this command:
dotnet publish --os linux -c Release -p:PublishProfile=DefaultContainer -p:ContainerImageTag=1.0.1 -p:ContainerRegistry=julioc.azurecr.io
Notice the ContainerImageTag parameter, which sets a new tag for your container image and the ContainerRegistry parameter, which specifies the target registry.
Step 3: Pull your Docker image into your production box from the Docker registry
Any machine in your production environment (physical or virtual) that has Docker installed and can reach the Internet can now pull down your Docker image from your ACR.
So, in your production box, first run this command to login to your ACR:
docker login julioc.azurecr.io -u julioc -p fBVakw5ygPBNbCdGYNl8S...
And then pull your Docker image from your ACR with this:
docker pull julioc.azurecr.io/hellodocker:1.0.0
You’ll get something like this:
1.0.0: Pulling from hellodocker
1d5252f66ea9: Pull complete
75b8c875f256: Pull complete
3b04a5dc83ef: Pull complete
6703541983d9: Pull complete
97d99dc7c01e: Pull complete
62364498fa6d: Pull complete
Digest: sha256:e052d0e7396c76cd4951be3cd2e65448968c3bf9691c65d2472df863bde475ea
Status: Downloaded newer image for julioc.azurecr.io/hellodocker:1.0.0
julioc.azurecr.io/hellodocker:1.0.0
And, just like that, your production box is ready to run your .NET app via your Docker image.
No need to install the correct OS or .NET dependencies. No need to install your app. No need to configure anything. IT WILL JUST WORK!
Step 4: Use your Docker image to run your .NET app as a container in your production box
It’s time to start your .NET app in your production box.
For this, all we have to do is run this command to run the app as a Docker container:
docker run -it --rm -p 80:80 julioc.azurecr.io/hellodocker:1.0.0
Regarding the parameters used with this command:
- The -it parameter tells Docker to run the container in interactive mode, so we can see the logs in the console.
- The –rm parameter tells Docker to remove the container when it stops running.
- The -p 80:80 parameter tells Docker to map port 80 in the container to port 80 in the host machine.
And, just like in your local box, you can make a GET request to your API in the production box, this time using the default port 80:
GET http://localhost/weatherforecast
HTTP/1.1 200 OK
[
  {
    "date": "2023-08-08",
    "temperatureC": 30,
    "summary": "Chilly",
    "temperatureF": 85
  },
  ...
]
Mission accomplished!
How to run my docker container in the cloud?
To run your containers in the cloud you can prepare a VM with Docker via your cloud provider or, if you don’t want to have to prepare any production VM, and just run the containers, you can use services like Azure Kubernetes Service (AKS), which I cover in my microservices program.
And that’s it for today. I hope you enjoyed it.
Whenever you’re ready, there are 3 ways I can help you:
-
Building Microservices With .NET: The only .NET backend development training program that you need to become a Senior C# Backend Developer.
-
ASP.NET Core Full Stack Bundle: A carefully crafted package to kickstart your career as an ASP.NET Core Full Stack Developer, step by step.
-
Promote yourself to 15,000+ subscribers by sponsoring this newsletter.