
Read time: 6 minutes
Today I’ll dive into the world of cloud-native development using .NET Aspire.
Cloud-native applications are a hot topic these days given their unique ability to take full advantage of the scalability, resilience, and manageability of the cloud.
But even with all its benefits, going cloud-native has traditionally been quite a challenge for .NET developers. There are lots of moving parts and the developer experience was painful.
Fortunately, that’s not the case anymore, thanks to the powerful capabilities of .NET Aspire.
Let’s see how to turn a full-stack application into a cloud-native application using .NET Aspire.
What is Cloud Native?
Imagine you are working on a modern, full-stack application, whose purpose is to manage a catalog of products, and which is made of the following traditional components:
- A frontend UI, which users can access through a web browser
- A backend API, which the frontend uses to retrieve and update the product catalog
- A database, which the backend uses to store the product catalog
- Some sort of file storage, which the frontend uses to store the product images

You got your app working locally, but now you need to get it ready for the cloud, where everyone will be able to access it.
However, that is easier said than done because you eventually realize that you need to address a few challenges, such as:
- Service Discovery: You need to make sure that your frontend can talk to your backend, and that both frontend and backend can talk to their dependent services
- Resilience: You need to make sure that your app can recover from failures, such as a server going down
- Deployment: You need to make sure that you can deploy your app to the cloud, and that you can do so in a way that is fast, reliable, and repeatable
- Observability: You need to make sure that you can monitor your app, and that you can quickly identify and fix any issues that may arise
- Scalability: You need to make sure that your app can handle a large number of users, without crashing or slowing down
To address all these concerns you need to turn your full-stack application into a cloud-native application.
A cloud-native application is a specific type of distributed app that takes full advantage of the scalability, resilience, and manageability of the cloud.
Going cloud-native has traditionally been quite a challenge for .NET developers, but not anymore.
What is .NET Aspire?
.NET Aspire is an opinionated, cloud-ready stack for building observable, production-ready, cloud-native applications.
It is designed to improve the experience of building .NET cloud-native apps via a consistent, opinionated set of tools and patterns that help you build and run distributed apps.
![]()
The way .NET Aspire achieves this is by providing .NET developers with:
- Orchestration: Handles running and connecting multi-project applications and their dependencies.
- Components: NuGet packages for commonly used services with standardized interfaces ensuring they connect consistently and seamlessly with your app.
- Tooling: Project templates and tooling experiences that help you create and interact with .NET Aspire apps.
Let’s see how to turn our full-stack application into a cloud-native application using .NET Aspire.
Step 1: Install .Net Aspire
.NET Aspire will likely be included as part of the .NET SDK at some point, but at the time of writing, you need to manually install it with these commands:
dotnet workload update
dotnet workload install aspire
I’m also assuming you already got the .NET 8 SDK and Docker Desktop into your box. If not, time to download and install them.
Step 2: Add the .NET Aspire projects
You’ll need to add 2 new projects to your solution to turn your app into a .NET Aspire app:
- App Host: An orchestrator project designed to connect and configure the different projects and services of your app.
- Service Defaults: A shared project to manage configurations that are reused across the projects in your solution related to resilience, service discovery, and telemetry.
You can add them quick with the project templates provided by .NET Aspire:
dotnet new aspire-apphost -n GameStore.AppHost
dotnet new aspire-servicedefaults -n GameStore.ServiceDefaults
Step 3: Enable the Service Defaults
Your new Service Defaults project includes pre-configured settings telemetry, health checks, service discovery, and a few other essential cloud-native aspects.
To enable them in your application, first add a reference from both your frontend and backend projects to the Service Defaults project.
Then, in the Program.cs file of both frontend and backend projects, add the following call to enable the Service Defaults:
builder.AddServiceDefaults();
And this other line to map your health check endpoints:
app.MapDefaultEndpoints();
Now it’s time to model our cloud-native application via the App Host.
Step 4: Define the app model
In .NET Aspire, the app model is what describes all the resources in your cloud-native application and their relationships.
To define your app model, start by adding a reference from the App Host project to both your backend and frontend projects.
And, since our application makes use of Azure resources (Blob Storage), we also need to install this NuGet package in the App Host project:
dotnet add package Aspire.Hosting.Azure --prerelease
Then, in the Program.cs file of the App Host project, add the following code to define the app model:
var builder = DistributedApplication.CreateBuilder(args);

// Add a PostgreSQL container, with a GameStore database
// Enable PgAdmin for easy DB management and deploy to the
// cloud as an Azure PostgreSQL Flexible Server.
var adminUser = builder.AddParameter("adminUser");
var adminPassword = builder.AddParameter("adminPassword", secret: true);
var postgres = builder.AddPostgres("postgres")
                      .WithPgAdmin()
                      .PublishAsAzurePostgresFlexibleServer(adminUser, adminPassword)
                      .AddDatabase("GameStore");

// Add the Azure Storage Emulator container, and enable the blob service
// Exposing it on port 10000 makes it easy to connect from Storage Explorer
var blobs = builder.AddAzureStorage("storage")
                   .RunAsEmulator(container =>
                   {
                        container.UseBlobPort(10000);
                   })
                   .AddBlobs("blobs");

// Add our backend API, and establish the dependency on PostgreSQL
var backend = builder.AddProject<Projects.GameStore_Api>("backend")
                     .WithReference(postgres);

// Add the frontend UI, and establish the dependency on both
// the backend API and the blob service
builder.AddProject<Projects.GameStore_Frontend>("frontend")
       .WithReference(backend)
       .WithReference(blobs);

builder.Build().Run();
The comments in the code above should give you a good idea of what’s going on, but in essence, that’s how we tell .NET Aspire about the structure of our cloud-native app, all using C# code.
Now let’s see how to update our frontend and backend projects to make use of the services we’ve defined in the app model.
Step 5: Use .NET Aspire components
.NET Aspire provides a series of components in the form of NuGet packages that make it really easy to connect your app with any dependent services.
Starting with our backend API, we know it needs to connect to a database, in particular, a PostgreSQL database.
For this, we could use the standard Npgsql package, but .NET Aspire provides a more opinionated and cloud-native package. So let’s install it into our backend project:
dotnet add package Aspire.Npgsql.EntityFrameworkCore.PostgreSQL --prerelease
Then you can add the following code to your backend Program.cs to register your PostgreSQL DBContext:
builder.AddNpgsqlDbContext<GameStoreContext>("GameStore");
But where is that “GameStore” connection string coming from? It comes from your App Host project, where we did this:
var postgres = builder.AddPostgresContainer("postgres")
                      .WithPgAdmin()
                      .AddDatabase("GameStore");
At runtime, the App Host will stand up the PostgreSQL container, figure out the right connection string to connect to the GameStore database and inject it as an environment variable into your backend API. Cool Magic!
What about the frontend?
Following the same idea, start by installing the Blob Storage NuGet package into your frontend project:
dotnet add package Aspire.Azure.Storage.Blobs --prerelease
And now you can add these few lines to your frontend Program.cs:
builder.AddAzureBlobService("blobs");

var gameStoreApiUrl = "http://backend";
builder.Services.AddHttpClient<GamesClient>(
    client => client.BaseAddress = new Uri(gameStoreApiUrl));
Here, “blobs” is the connection string you defined in the App Host project:
var blobs = builder.AddAzureStorage("storage")
                   .RunAsEmulator(container =>
                   {
                        container.UseBlobPort(10000);
                   })
                   .AddBlobs("blobs");
And “backend” is the name you gave to your backend API host, also in the App Host:
var backend = builder.AddProject<Projects.GameStore_Api>("backend")
                     .WithReference(postgres);
You don’t even need to start thinking about all these connection strings and URLs. .NET Aspire will take care of all that for you. Pretty amazing.
Now you are ready to run your cloud-native app locally.
Step 6: Run your .NET Aspire app
Make sure your Docker Desktop is running, and then start the App Host:
dotnet run --project .\GameStore.AppHost
You’ll see something like this in your terminal:
info: Aspire.Hosting.DistributedApplication[0]
      Distributed application starting.
info: Aspire.Hosting.DistributedApplication[0]
      Now listening on: http://localhost:15127
info: Aspire.Hosting.DistributedApplication[0]
      Distributed application started. Press Ctrl+C to shut down.
Browse to that URL in your browser and you’ll land here:
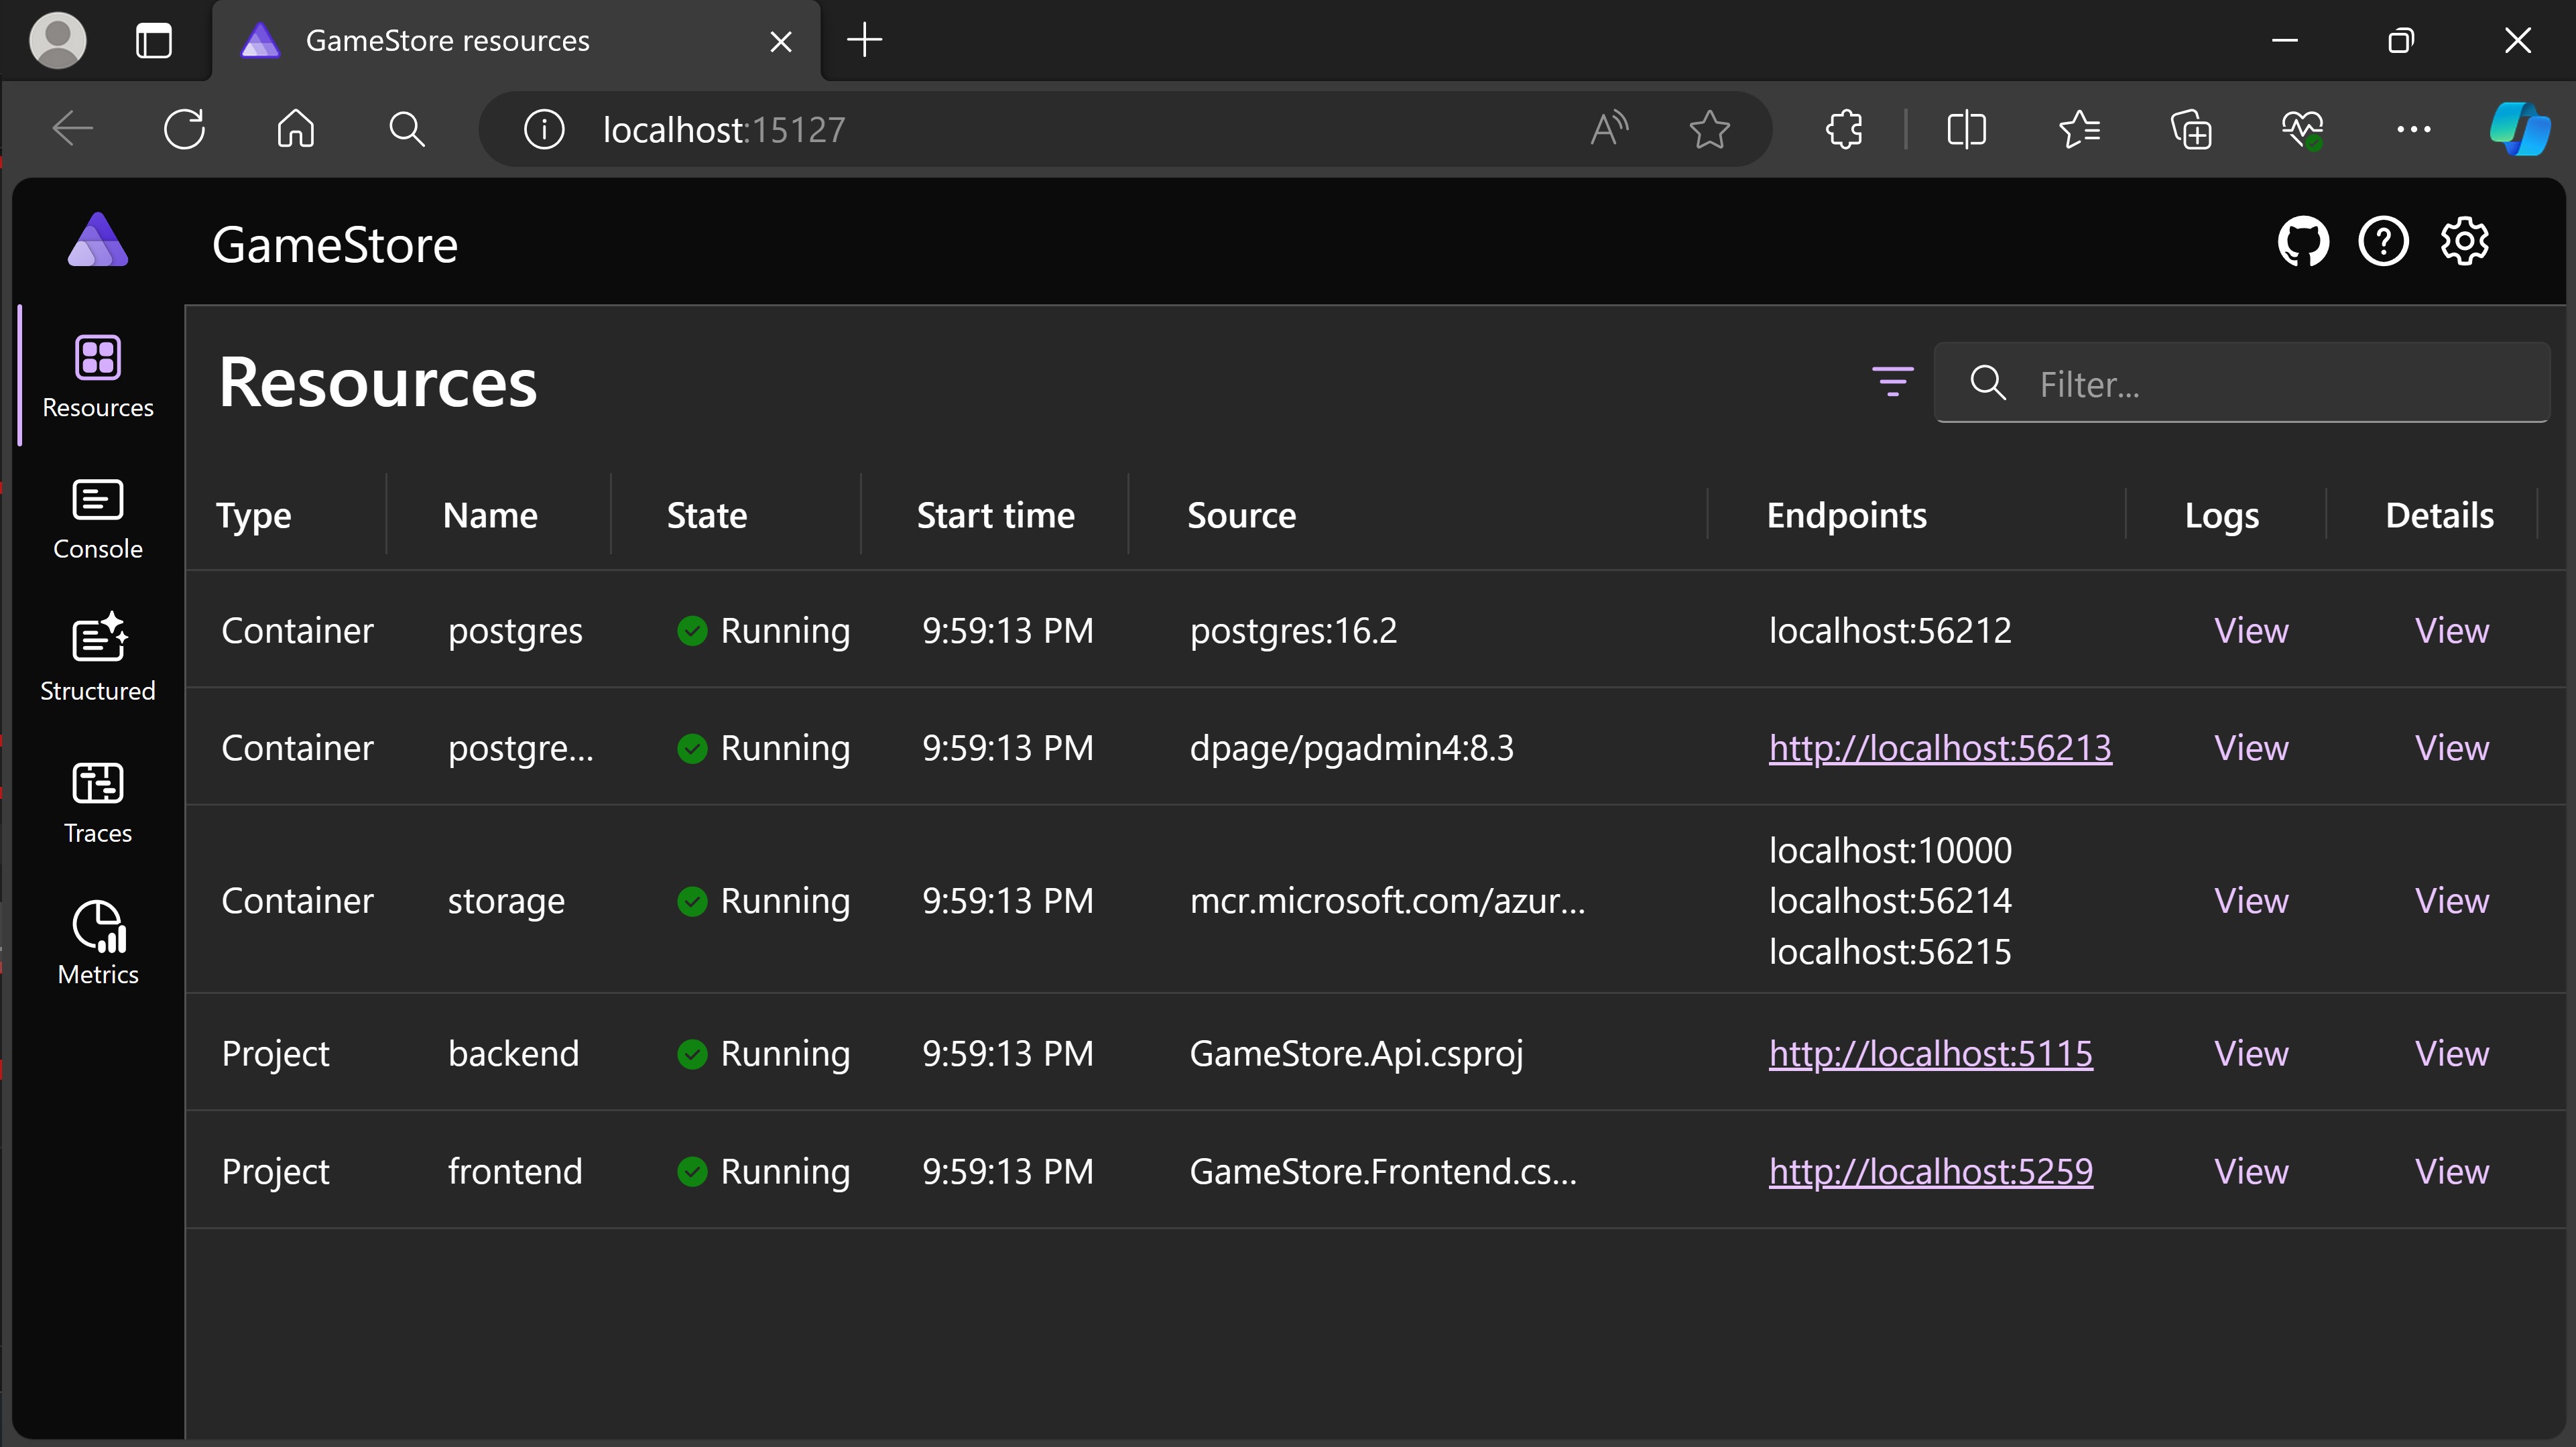
That’s the .NET Aspire dashboard, where you can see all the services and dependencies of your cloud-native app, and where you can monitor and manage them.
And if you click on the endpoint assigned to the frontend project, you’ll see your app running in the browser:

That’s it! You’ve turned your full-stack application into a cloud-native app using .NET Aspire.
If it is cloud-native, how to deploy it to the Azure cloud?
That’s the easiest part since .NET Aspire is designed to make it easy to deploy your app to the Azure cloud.
I won’t cover that part in this article, but you can take a look at this video where I go over all the details.
And that’s it for today.
I hope it was useful.
Whenever you’re ready, there are 3 ways I can help you:
-
Building Microservices With .NET: The only .NET backend development training program that you need to become a Senior C# Backend Developer.
-
ASP.NET Core Full Stack Bundle: A carefully crafted package to kickstart your career as an ASP.NET Core Full Stack Developer, step by step.
-
Promote yourself to 15,000+ subscribers by sponsoring this newsletter.