
Read time: 5 minutes
Today I’ll show you how to quickly get your microservices to talk to each other using the MassTransit distributed application framework.
As your system grows you will inevitably end up with multiple microservices that somehow need to share information.
The problem is that many folks jump right away into using HTTP calls for this, which introduces a bunch of issues.
If you instead start with distributed messaging, you’ll end up with a system that is:
- Loosely coupled
- More resilient to failures
- Can distribute the load much better
- Enjoys reduced latency
Let’s dive in.
The Problem With Synchronous Communication
Synchronous communication between microservices via REST API calls might be the right way to do things some times, like in the rare case when you need an immediate response from the called service.

But in general it’s not a good idea since it introduces a bunch of issues:
- Strong coupling, which makes it hard to evolve microservices independently.
- Cascading failures, since if the called service fails, the caller will fail too.
- Scalability limitations, since the more callers a service has, the more instances of that service you’ll need to handle the load.
- Increased latency, since the caller has to wait for responses from the called service.
How Can Asynchronous Communication Help?
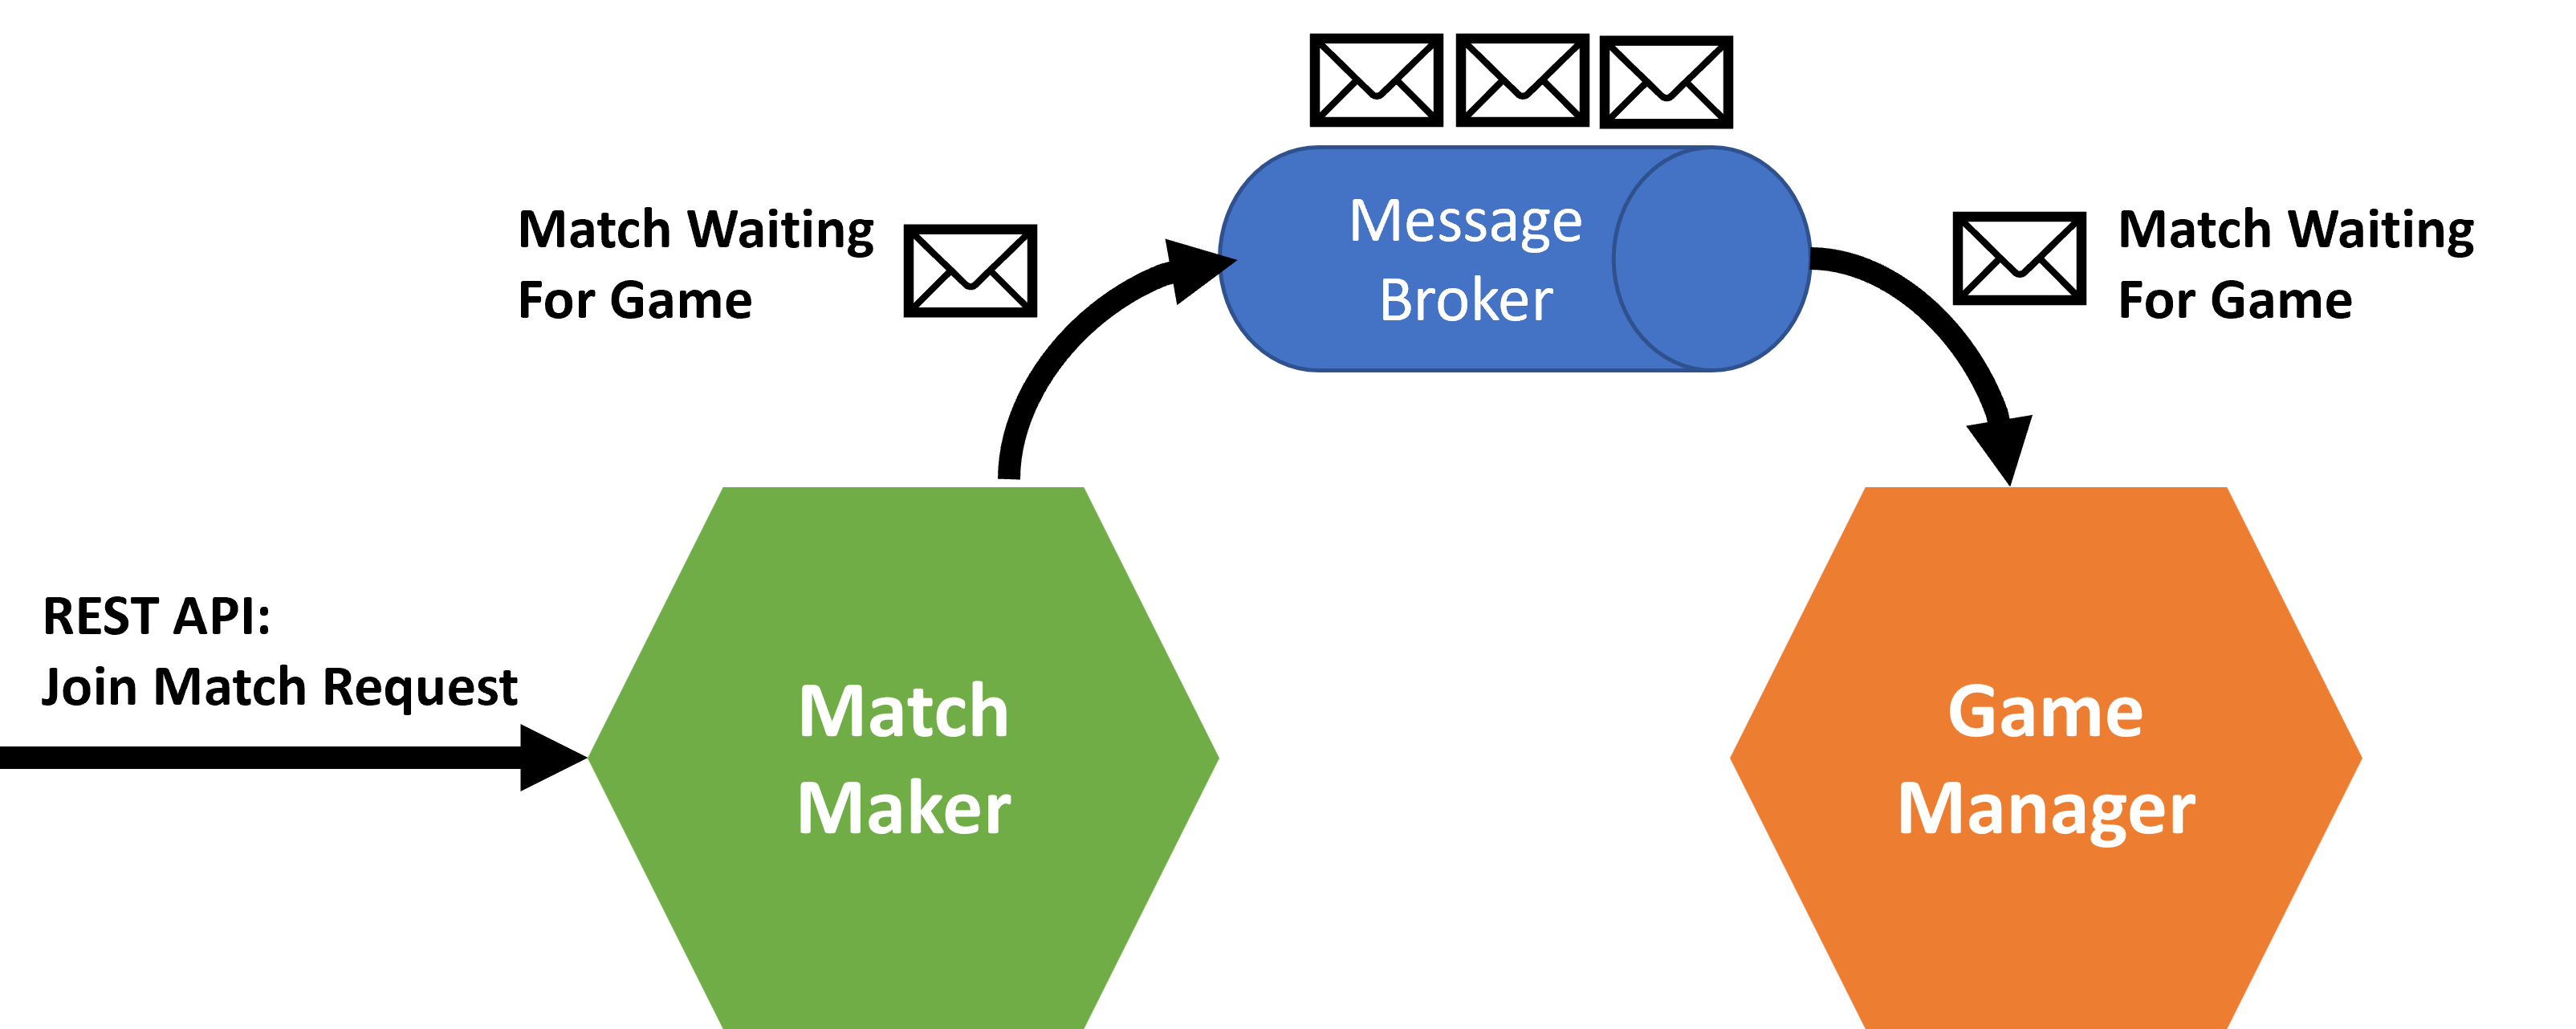
With asynchronous communication or distributed messaging, there is always an intermediary in the middle, a message broker, which takes care of receiving and sending messages.
Because there’s no coupling between microservices, you get a bunch of benefits right away:
- Loose coupling between microservices, which makes it easier to evolve them independently.
- Resilience, since having one service fail won’t affect the others.
- Better load distribution, since you can easily add more instances of a service to handle more load.
- Reduced latency, since the caller doesn’t have to wait for the response.
But enabling this kind of communication in your .NET microservices seems like a lot of work.
Or, is it?
What Is MassTransit?
MassTransit is an open-source distributed application framework for .NET that provides a consistent abstraction on top of the supported message transports.
![]()
It simplifies the development of complex, decoupled, and scalable applications by enabling communication between different components using messages.
Let’s see how to use it to enable asynchronous communication between two simple microservices.
Step 1: Add The MassTransit NuGet Package
We’ll need a message broker to sit between our microservices, and for some quick local testing RabbitMQ is the way to go.
So let’s start by adding the MassTransit.RabbitMQ NuGet package to both of our microservices.
dotnet add package MassTransit.RabbitMQ
Step 2: Create The Message Contract
The Match Maker microservice somehow needs to communicate to the Game Manager microservice that a new game match is ready and that it is waiting for a game to be provisioned.
So a contract needs to be established to clearly represent this intent.
Let’s create a MatchWaitingForGame record in our MatchMaker.Contracts project:
public record MatchWaitingForGame(Guid MatchId);
Record types are ideal for contracts because they are easier to define than classes and they are immutable by default, which works well for messages, since they should not change after they are sent.
To keep things simple, let’s assume that both microservices are in the same code base, so both them can simply reference the MatchMaker.Contracts project to get access to MatchWaitingForGame.
Later on, as Game Manager moves to it’s own repo (as it should be) you can turn MatchMaker.Contracts into a NuGet package and have Game Manager reference it instead.
Step 3: Publish The Message
To publish messages, Match Maker can request an instance of IBus from the dependency injection container:
public class GameMatcher : IGameMatcher
{
    private readonly IBus bus;

    public GameMatcher(IBus bus)
    {
        this.bus = bus;
    }

    // More code here...
}
Then call its Publish method with a MatchWaitingForGame message when it’s time to notify Game Manager that a new match is ready:
await bus.Publish(new MatchWaitingForGame(match.Id));
Here’s the complete GameMatcher class:
public class GameMatcher : IGameMatcher
{
    private readonly IGameMatchRepository repository;
    private readonly IBus bus;
    private readonly ILogger<GameMatcher> logger;

    public GameMatcher(IGameMatchRepository repository, IBus bus, ILogger<GameMatcher> logger)
    {
        this.repository = repository;
        this.bus = bus;
        this.logger = logger;
    }

    public async Task<GameMatchResponse> MatchPlayerAsync(JoinMatchRequest matchRequest)
    {
        string playerId = matchRequest.PlayerId;

        // Is the player already assigned to a match?
        GameMatch? match = await repository.FindMatchForPlayerAsync(playerId);

        if (match is null)
        {
            // Is there an open match he can join?
            match = await repository.FindOpenMatchAsync();

            if (match is null)
            {
                // Create a new match
                match = new GameMatch(Guid.NewGuid(), playerId);

                await repository.CreateMatchAsync(match);
            }
            else
            {
                // Assign to open match
                match.SetPlayer2(playerId);
                await repository.UpdateMatchAsync(match);
                await bus.Publish(new MatchWaitingForGame(match.Id));
            }

            logger.LogInformation("{PlayerId} assigned to match {MatchId}.", playerId, match.Id);
        }
        else
        {
            logger.LogInformation("{PlayerId} already assigned to match {MatchId}.", playerId, match.Id);
        }

        return match.ToGameMatchResponse();
    }
}
And here’s the minimal API endpoint that makes use of GameMatcher:
public static class MatchMakerEndpoints
{
    public static RouteGroupBuilder MapMatchMakerEndpoints(this IEndpointRouteBuilder routes)
    {
        var group = routes.MapGroup("/matches");

        group.MapPost("/", async (JoinMatchRequest request, IGameMatcher matcher) =>
        {
            return await matcher.MatchPlayerAsync(request);
        });

        return group;
    }
}
Step 4: Consume The Message
MassTransit introduces the concept of a consumer, a class that implements the IConsumer interface and that is responsible for handling messages of a specific type.
So in Game Manager, let’s create a MatchWaitingForGameConsumer class that implements IConsumer<MatchWaitingForGame>:
public class MatchWaitingForGameConsumer : IConsumer<MatchWaitingForGame>
{
    private readonly ILogger<MatchWaitingForGameConsumer> logger;

    public MatchWaitingForGameConsumer(ILogger<MatchWaitingForGameConsumer> logger)
    {
        this.logger = logger;
    }

    public async Task Consume(ConsumeContext<MatchWaitingForGame> context)
    {
        var receivedMessage = context.Message;

        logger.LogInformation(
            "Received MatchWaitingForGame request for match: {MatchId}. Provisioning game...",
            receivedMessage.MatchId);

        // TODO: Implement the game provisioning magic here
        await Task.Delay(TimeSpan.FromSeconds(5));

        logger.LogInformation(
            "Game for match {MatchId} succesfully provisioned!",
            receivedMessage.MatchId);
    }
}
So, any time a new MatchWaitingForGame message is available in RabbitMQ, the Consume method will be called, and the message will be available in the context.Message property.
Step 5: Register The MassTransit Services
In your Match Maker microservice Program.cs file, add this:
builder.Services.AddMassTransit(configurator =>
{
    configurator.UsingRabbitMq();
});
That will take care of registering the required MassTransit services and will also open the bus of communication to RabbitMQ.
You can further configure RabbitMQ in that UsingRabbitMq call, specifying things like the RabbitMQ host, port, username, password, etc. But for now we’ll just use the defaults.
You need to do something similar in your Game Manager microservice Program.cs file, but in that case you also need to register and configure your consumer:
services.AddMassTransit(x =>
{
    x.AddConsumer<MatchWaitingForGameConsumer>();
    x.UsingRabbitMq((context, cfg) =>
    {
        cfg.ConfigureEndpoints(context);
    });
});
AddConsumer registers your consumer with MassTransit, and ConfigureEndpoints configures the RabbitMQ endpoints for it.
The combination of making those two additional calls is what’s going to automatically create the actual exchange and queue for your consumer in the RabbitMQ instance.
Step 6: Standup The RabbitMQ Instance
We are almost ready to test this out, but before that we need some actual RabbitMQ instance in our box.
The easiest way to do that is to use the RabbitMQ Docker image.
So, run this in your terminal:
docker run -d --rm --hostname rabbitmq --name rabbitmq -p 5672:5672 -p 15672:15672 rabbitmq:3-management
After the container starts, you can access the RabbitMQ management console at http://localhost:15672 with the default username and password of guest.
Step 7: Start Exchanging Messages
Now run both microservices:
dotnet run
You should see something like this in your terminals:
info: MassTransit[0]
      Bus started: rabbitmq://localhost/
Which means that both microservices were able to connect to RabbitMQ.
Now, send a couple of requests to Match Maker’s /matches endpoint to put a couple of players in a new match:
POST http://localhost:5031/matches
content-type: application/json

{
    "playerId": "player1"
}

POST http://localhost:5031/matches
content-type: application/json

{
    "playerId": "player2"
}
HTTP/1.1 200 OK

{
  "id": "d562716f-9bb0-42c7-a248-80752adf017b",
  "player1": "player1",
  "player2": "player2",
  "state": "MatchWaitingForGame"
}
Notice that both requests come back immediately, no waiting for a response from Game Manager. Yes!
And, in the meanwhile, you’ll see this in Game Manager’s console:
info: GameManager.Consumers.MatchWaitingForGameConsumer[0]
      Received MatchWaitingForGame request for match: d562716f-9bb0-42c7-a248-80752adf017b. Provisioning game...
info: GameManager.Consumers.MatchWaitingForGameConsumer[0]
      Game for match d562716f-9bb0-42c7-a248-80752adf017b succesfully provisioned!
And, if you head to the RabbitMQ management console, you’ll find your new MatchWaitingForGame queue, and a small spike for the message that was just published and consumed:

And, you’re done!
What If You Want To Use Something Else Like Azure Service Bus Instead?
That’s the beauty of MassTransit. You can easily switch to a different message transport by simply adding a different NuGet package:
dotnet add package MassTransit.Azure.ServiceBus.Core
And then changing the UsingRabbitMq call to UsingAzureServiceBus in Program.cs:
services.AddMassTransit(x =>
{
    x.UsingAzureServiceBus((context,cfg) =>
    {
        cfg.Host("your connection string");

        cfg.ConfigureEndpoints(context);
    });
});
The rest of your code doesn’t need to know about this change. It will just work!
And that’s it for today.
I hope you enjoyed it.
Whenever you’re ready, there are 3 ways I can help you:
-
Building Microservices With .NET: The only .NET backend development training program that you need to become a Senior C# Backend Developer.
-
ASP.NET Core Full Stack Bundle: A carefully crafted package to kickstart your career as an ASP.NET Core Full Stack Developer, step by step.
-
Promote yourself to 15,000+ subscribers by sponsoring this newsletter.