
Read time: 5 minutes
Today I’ll show you how to secure your ASP.NET Core API in a few simple steps.
Having a secure API is a must these days. You just can’t go to production without this.
But knowing the right authentication and authorization mechanism can be a bit tricky.
Fortunately, token-based authentication via JSON Web Tokens (JWT) is a great option for most scenarios, and it is quite easy to implement in ASP.NET Core.
Let’s see how to do it.
What Is Token-Based Authentication?
Token-based authentication is a popular method used in modern web applications and APIs to securely authenticate users and control access to resources.
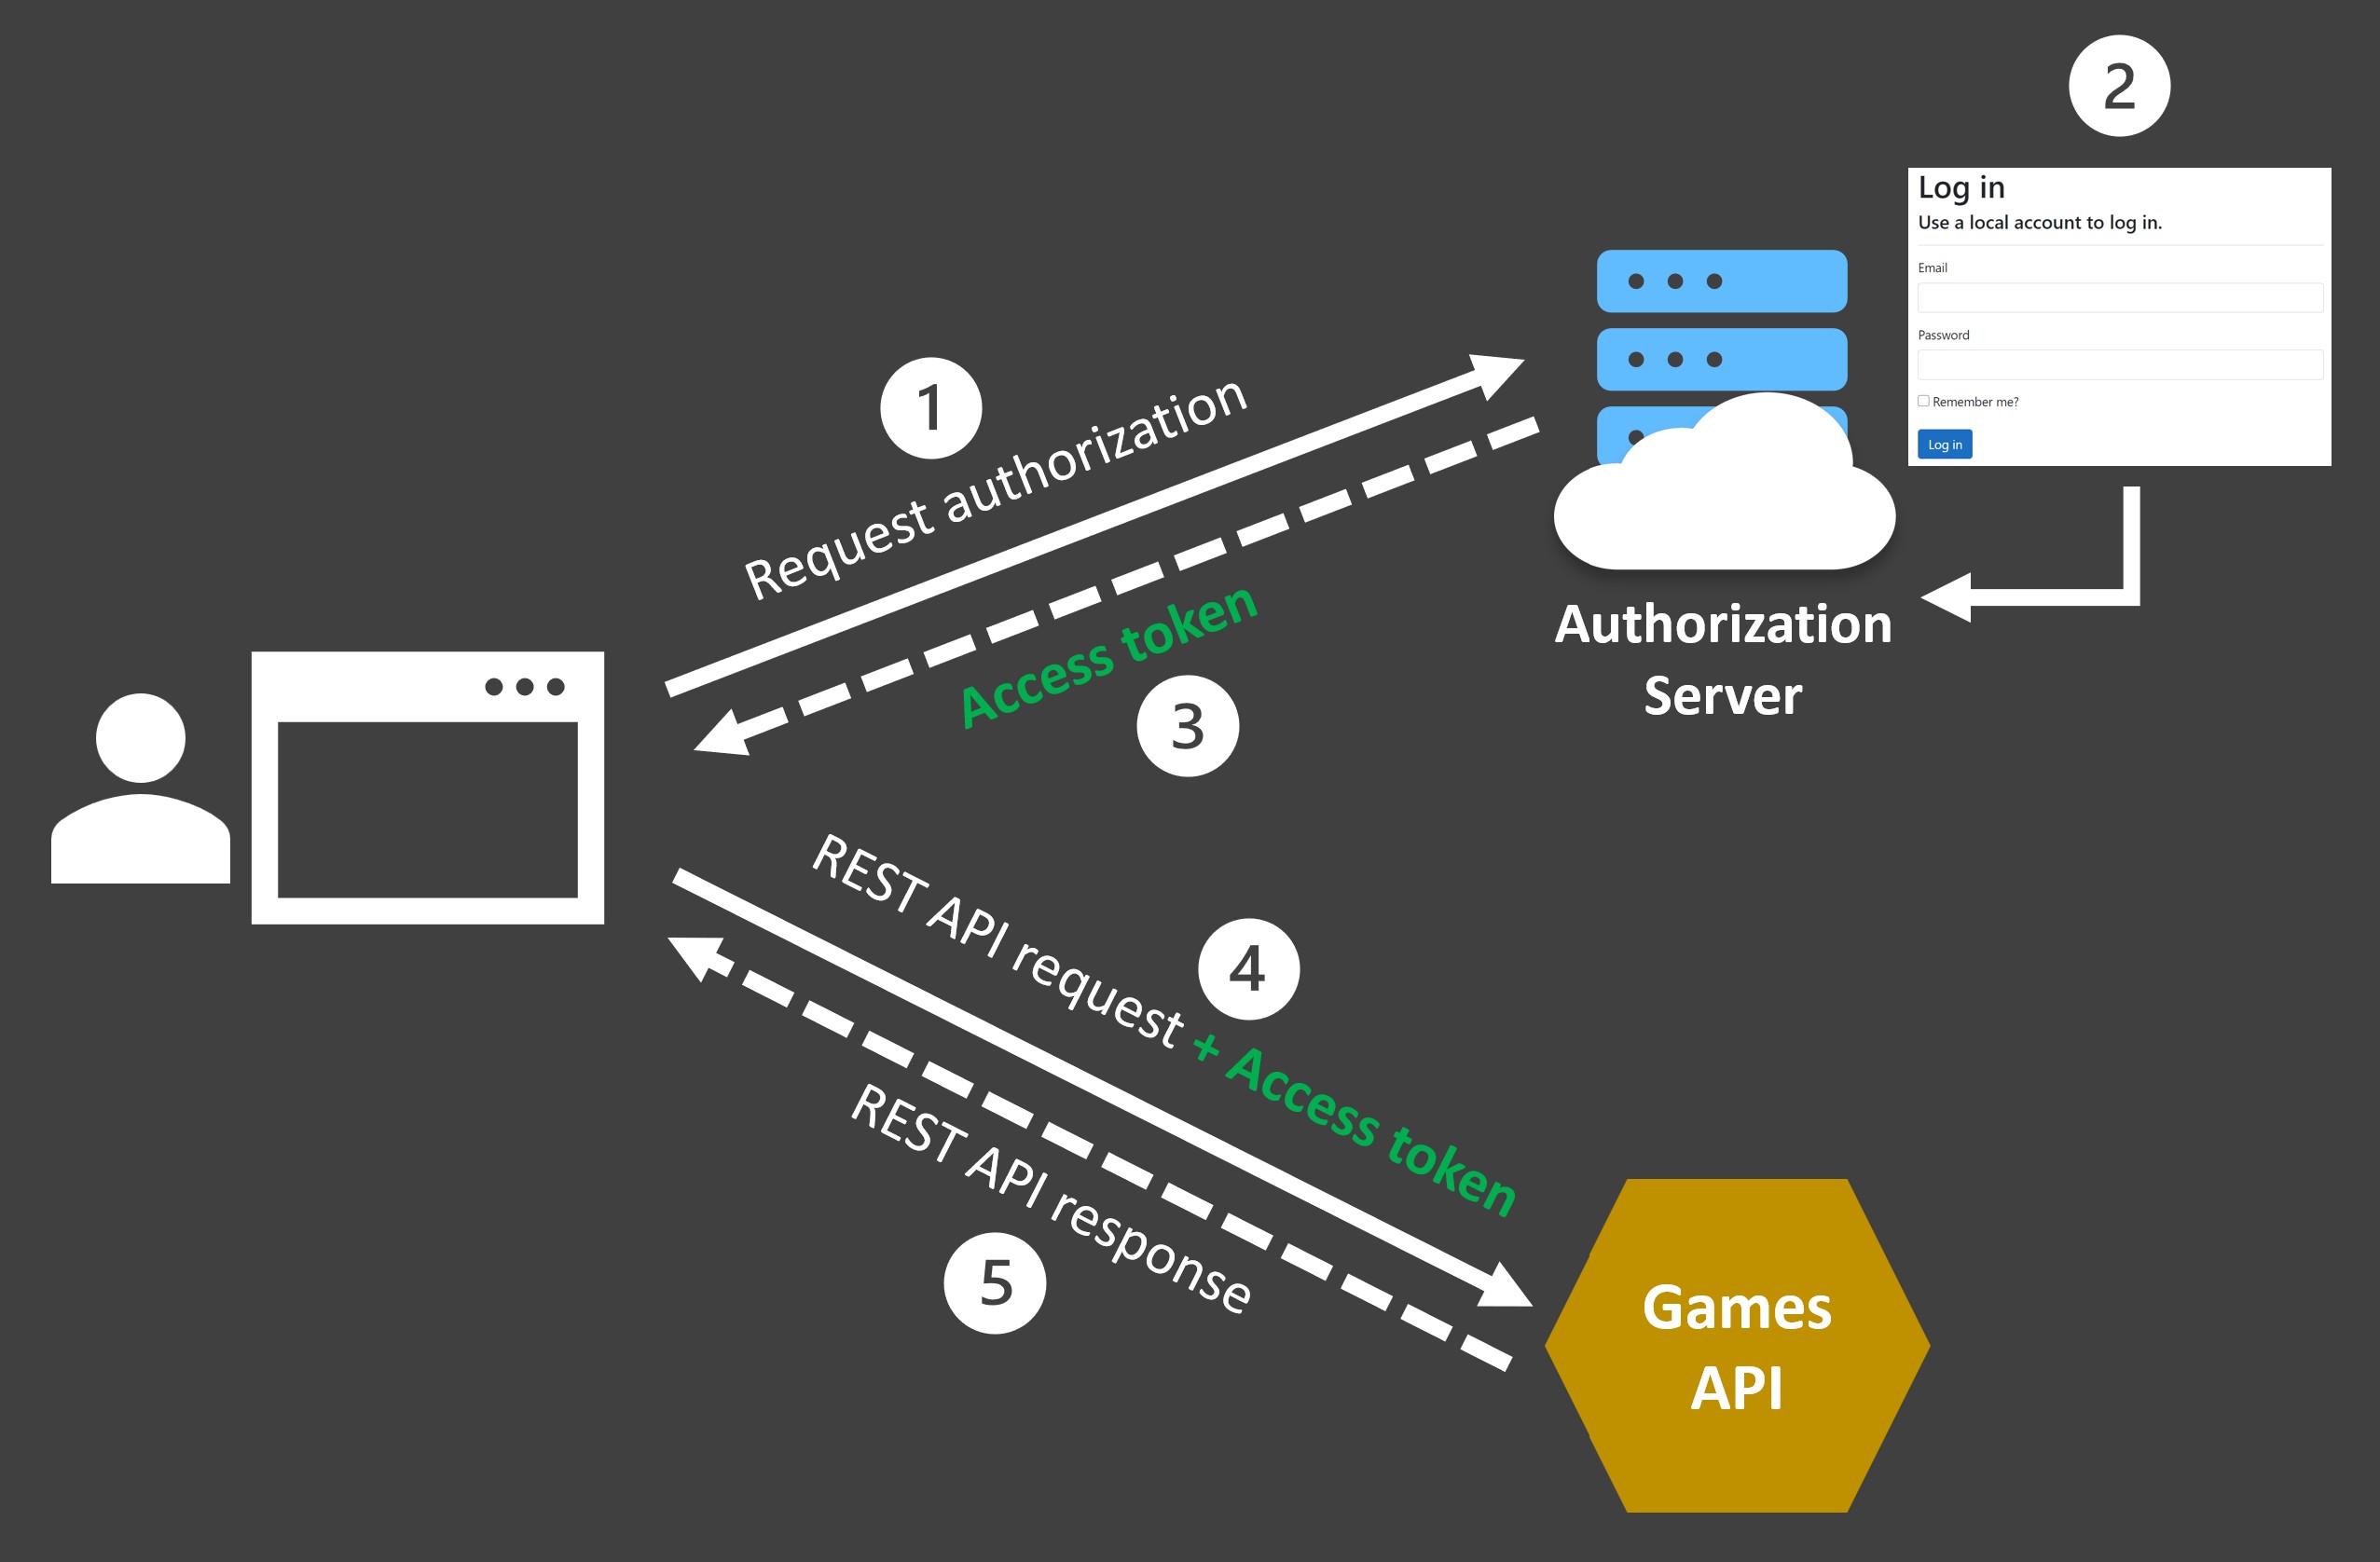
It follows the following broader steps:
1. Request authorization. The client requests authorization to access your API by sending the user’s credentials to an authentication server.
2. Authenticate the user. The authorization server authenticates the user via a login page or any other sort of authentication mechanism.
3. Generate an access token. If authentication succeeds, the authorization server generates an encoded JWT access token and returns it to the client.
4. Use the access token, The client uses the access token to access the protected API resource.
5. Validate the token and return the response. The API decodes and validates the access token, and if it’s valid, it returns the requested resource.
The Games API
Here’s a simple ASP.NET Core API that returns a list of games for a given player:
Dictionary<string, List<string>> gamesMap = new()
{
    {"player1", new List<string>(){"Street Fighter II", "Minecraft"}},
    {"player2", new List<string>(){"Forza Horizon 5", "FIFA 23"}}
};

var builder = WebApplication.CreateBuilder(args);

var app = builder.Build();

app.MapGet("/playergames", () => gamesMap);

app.Run();
Let’s see now how to secure the /playergames endpoint in a few simple steps.
Step 1: Enable Authentication
Authentication is the process of determining a user’s identity.
Since we want to enable authentication to our endpoint using access tokens, and specifically JWTs, let’s add the NuGet package that enables the JWT bearer authentication strategy:
dotnet add package Microsoft.AspNetCore.Authentication.JwtBearer
Then, let’s add the required JWT bearer authentication services, which will allow our app to accept and validate the incoming access tokens:
var builder = WebApplication.CreateBuilder(args);

builder.Services.AddAuthentication().AddJwtBearer();

var app = builder.Build();
With that, we are ready to authenticate incoming requests.
Step 2: Require Authorization
Authorization is the process of determining whether a user has access to a resource.
We need to tell our app which endpoints require authorization and what kind of authorization policy to use.
In our case, we want to require authorization for the /playergames endpoint, and perhaps we can start with the default authorization policy.
We can do that via the RequireAuthorization() method:
app.MapGet("/playergames", () => gamesMap)
   .RequireAuthorization();
That will make sure any requests to this endpoint that have not been authenticated, get rejected.
However, before we can use that method we also need to add the required authorization services.
So, let’s call AddAuthorizationBuilder() after the AddAuthentication() call:
var builder = WebApplication.CreateBuilder(args);

builder.Services.AddAuthentication().AddJwtBearer();
builder.Services.AddAuthorizationBuilder();

var app = builder.Build();
Step 3: Confirm Unauthenticated Calls Are Rejected
Let’s see what happens when we try to call the /playergames endpoint without authenticating first.
So, let’s create a small games.http file at your project root with this one line:
GET http://localhost:5026/playergames
To use that file, and if you are using VS Code, you can install the REST Client extension for VS Code.
Now, let’s open the terminal and run our app:
dotnet run
And now hit Send Request from the games.http file.
You should get this:
HTTP/1.1 401 Unauthorized
Content-Length: 0
Connection: close
Date: Wed, 02 Aug 2023 20:33:51 GMT
Server: Kestrel
WWW-Authenticate: Bearer
Perfect, the request gets rejected with a 401 Unauthorized status code, as it should.
Let’s see now how to get us an access token to authenticate our requests.
Step 4: Generate An Access Token
Usually, access tokens are generated by an authorization server, and you will certainly need one of those before deploying your app to production.
But for the sake of simplicity, let’s use the built-in dotnet user-jwts tool to quickly generate a token, and specifically a JWT, directly in our box.
So, stop your app and run this in your terminal:
dotnet user-jwts create
You’ll get something like this (shortened the token for brevity):
New JWT saved with ID 'a1f35af1'.
Name: julio

Token: eyJhbGciOiJIUzI1NiIsInR5cCI6IkpXVCJ9.eyJ1bmlxdWVfbmFtZSI6Imp1bGlv...
The long string is a JWT with a few basic claims that will work for local development.
If you decode it with a page like jwt.ms you will see something like this (removed header and signature for brevity):
{
  "unique_name": "julio",
  "sub": "julio",
  "jti": "a1f35af1",
  "aud": [
    "http://localhost:26691",
    "https://localhost:44374",
    "http://localhost:5026",
    "https://localhost:7109"
  ],
  "nbf": 1691011790,
  "exp": 1698960590,
  "iat": 1691011791,
  "iss": "dotnet-user-jwts"
}
So, you got a JWT issued to you (julio), meant for any of the URLs configured for your API and issued by the dotnet-user-jwts tool.
To match that JWT, the command you executed also added configurations for a new Bearer scheme to your appsettings.Development.json file:
"Authentication": {
  "Schemes": {
    "Bearer": {
      "ValidAudiences": [
        "http://localhost:26691",
        "https://localhost:44374",
        "http://localhost:5026",
        "https://localhost:7109"
      ],
      "ValidIssuer": "dotnet-user-jwts"
    }
  }
}
Step 5: Use The Access Token
With the new JWT handy, modify your games.http file to include the Authorization header with the JWT:
GET http://localhost:5026/playergames
Authorization: Bearer eyJhbGciOiJIUzI1NiIsInR5cCI6IkpXVCJ9.eyJ1bmlxdWVfbmFtZSI6Imp1bGlv...
Start your app again and hit Send Request in the .http file.
Now you should get this:
HTTP/1.1 200 OK
Connection: close
Content-Type: application/json; charset=utf-8
Date: Wed, 02 Aug 2023 21:43:55 GMT
Server: Kestrel
Transfer-Encoding: chunked

{
  "player1": [
    "Street Fighter II",
    "Minecraft"
  ],
  "player2": [
    "Forza Horizon 5",
    "FIFA 23"
  ]
}
Success!
The request is now authenticated and you get a 200 OK with the list of games for the player in the JWT.
Mission accomplished.
Next Steps
If you want a more advanced authorization policy, so you can require specific user roles or check for custom claims, I also got a YouTube video where I cover those details.
And if you are thinking on taking your API to production, I cover how to stand up your own authorization server in my .NET Microservices program and how to use a ready-to-go, hosted authorization server in my .NET REST APIs course.
Whenever you’re ready, there are 3 ways I can help you:
-
Building Microservices With .NET: The only .NET backend development training program that you need to become a Senior C# Backend Developer.
-
ASP.NET Core Full Stack Bundle: A carefully crafted package to kickstart your career as an ASP.NET Core Full Stack Developer, step by step.
-
Promote yourself to 15,000+ subscribers by sponsoring this newsletter.