Read time: 5 minutes
Today I’ll show you how to add an API Gateway to your .NET microservices-based system.
An API Gateway is a critical component in a microservices architecture because it acts as a single entry point for all the microservices in your system and provides multiple benefits that you don’t want to miss.
Sadly, there’s a crazy amount of information out there about API Gateways, and it can be overwhelming to figure out what you need to do to set one up.
So here I’ll show you one way to get it done quickly using one of the most popular open-source API Gateways for Kubernetes.
Let’s dive in.
What Is An API Gateway?
In simple terms, an API Gateway is a service that acts as a single entry point for all the microservices in your application.
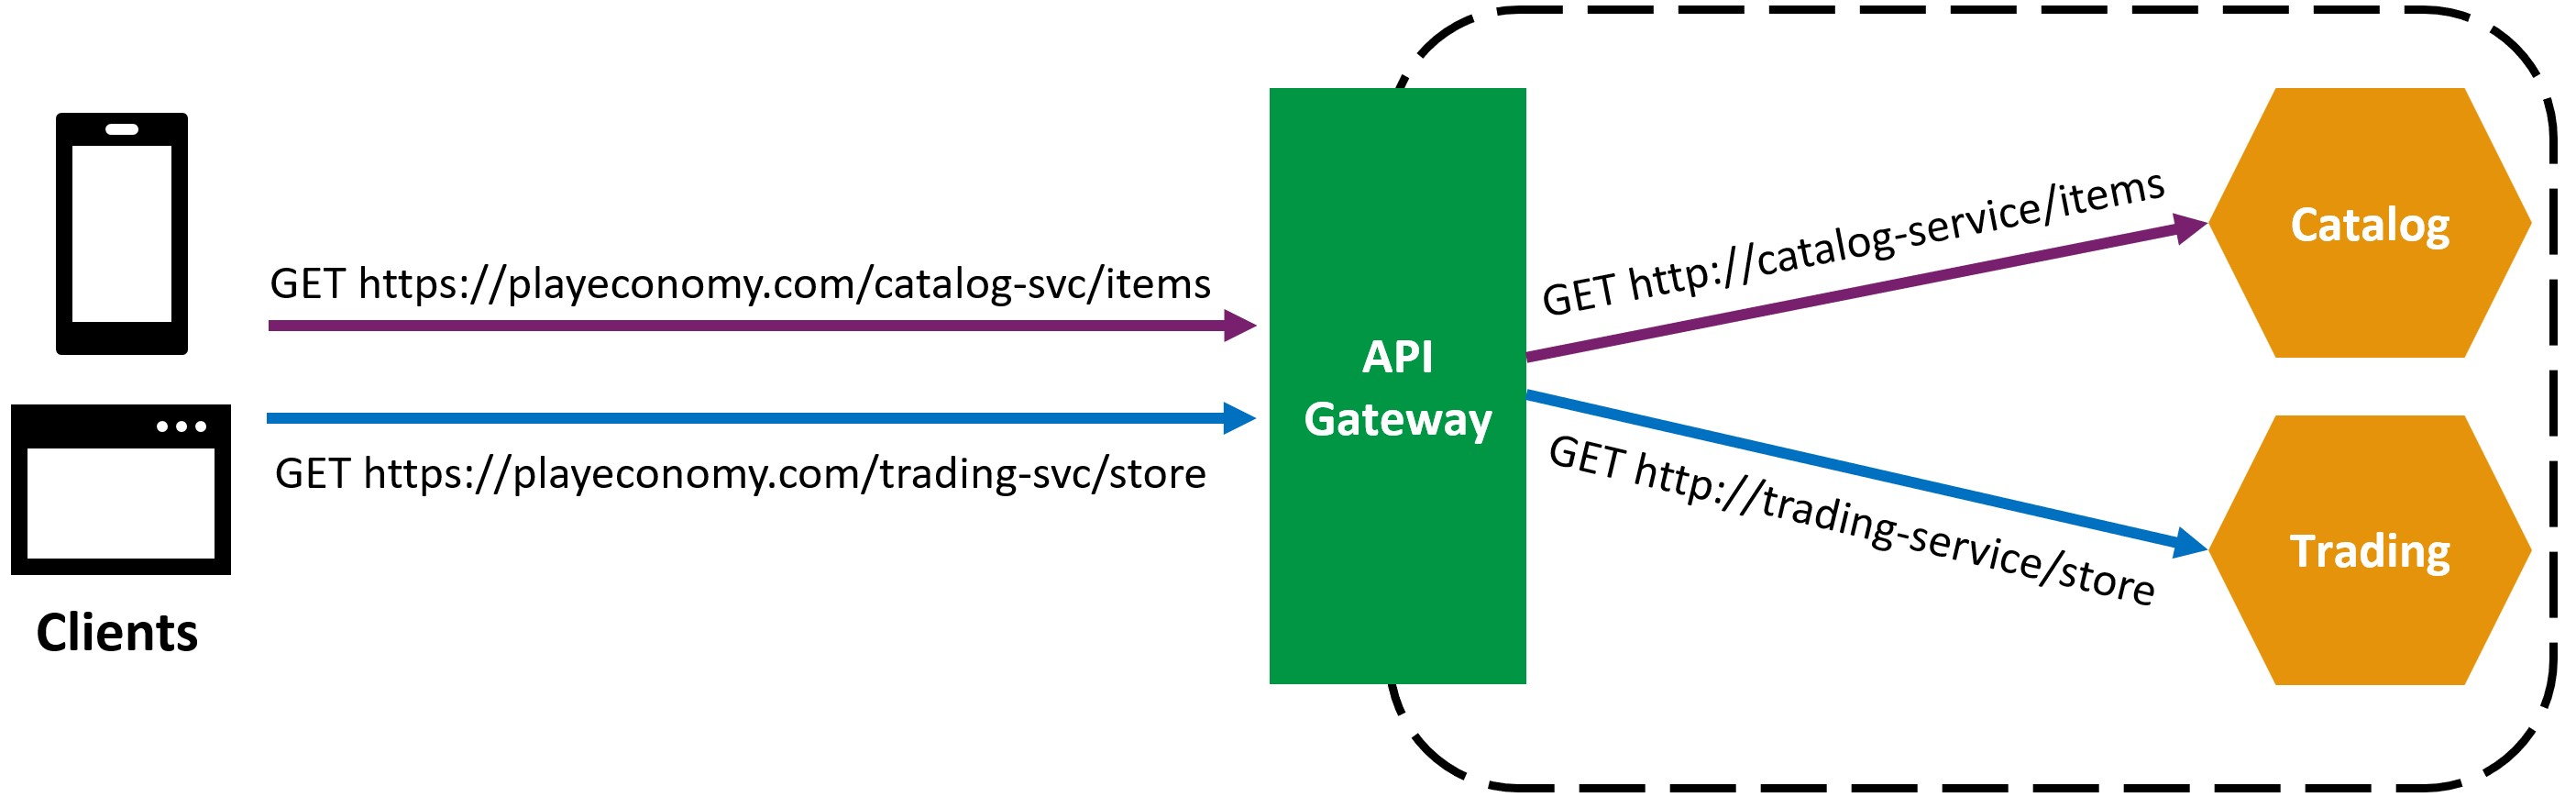
So, instead of having clients call each microservice directly, they call the API Gateway, which then routes the request to the appropriate microservice.
Why is it important to use an API Gateway in front of your microservices?
There are several reasons:
1. Single Public Endpoint: An API Gateway provides a single public endpoint for all your microservices. This makes it easier for clients to discover and consume your APIs, plus you only need to setup up one public IP address, domain name, and SSL certificate.
2. Security: An API Gateway can handle authentication and authorization for all the microservices in your application. This means you don’t have to implement security in each microservice, which can be error-prone and time-consuming.
3. TLS Termination: An API Gateway can terminate TLS connections, meaning that clients talk to the API gateway over HTTPS, but the API Gateway talks to your microservices over HTTP. This offloads the work of encrypting and decrypting traffic from your microservices.
4. Rate Limiting: An API Gateway can enforce rate limits on incoming requests, preventing clients from overwhelming your microservices.
5. Monitoring and Logging: An API Gateway can provide monitoring and logging for all the requests that pass through it. This can be useful for debugging and troubleshooting issues in your application.
And the good thing is that you don’t need to implement an API Gateway from scratch. There are several open-source API Gateway solutions available, so it is just a matter of picking the one that best fits your needs.
Here I’ll show you how to configure the one I’ve been using for the last few years.
Emissary-Ingress API Gateway
Emissary-Ingress is one the most popular open-source and Kubernetes-native API gateways.
It is a Cloud Native Computing Foundation (CNCF) incubating project that was initially created by the team at Ambassador Labs, and that uses the ubiquitous Envoy Proxy at its core.
I personally like it because:
- It is open-source and free to use
- It is specifically designed for Kubernetes (where every microservice should be running these days)
- It does not require writing any code to configure
Let’s see how to set it up.
Installing Emissary-Ingress
Since Emissary-Ingress runs on Kubernetes, you should already have a cluster and at least one microservice there before doing anything else.
If you need help with that part, please check my previous article over here.
You should also get the Helm tool into your box since using Helm charts is the easiest way to install Emissary-Ingress.
Now connect to your cluster and run these lines in your terminal:
# Add the Datawire Repo
helm repo add datawire https://app.getambassador.io
helm repo update

# Install the Custom Resource Definitions:
kubectl apply -f https://app.getambassador.io/yaml/emissary/3.9.1/emissary-crds.yaml

# Install Emissary-Ingress:
helm install emissary-ingress datawire/emissary-ingress \
--set service.annotations."service\.beta\.kubernetes\.io/azure-dns-label-name"=playeconomy \
-n emissary --create-namespace
That will deploy all the Emissary-Ingress resources into a new namespace called emissary in your K8s cluster.
It will also set up a load balancer with a public IP address in your cloud provider (Azure in my case) and, because of the azure-dns-label-name annotation, it will provide a public DNS name for the API Gateway.
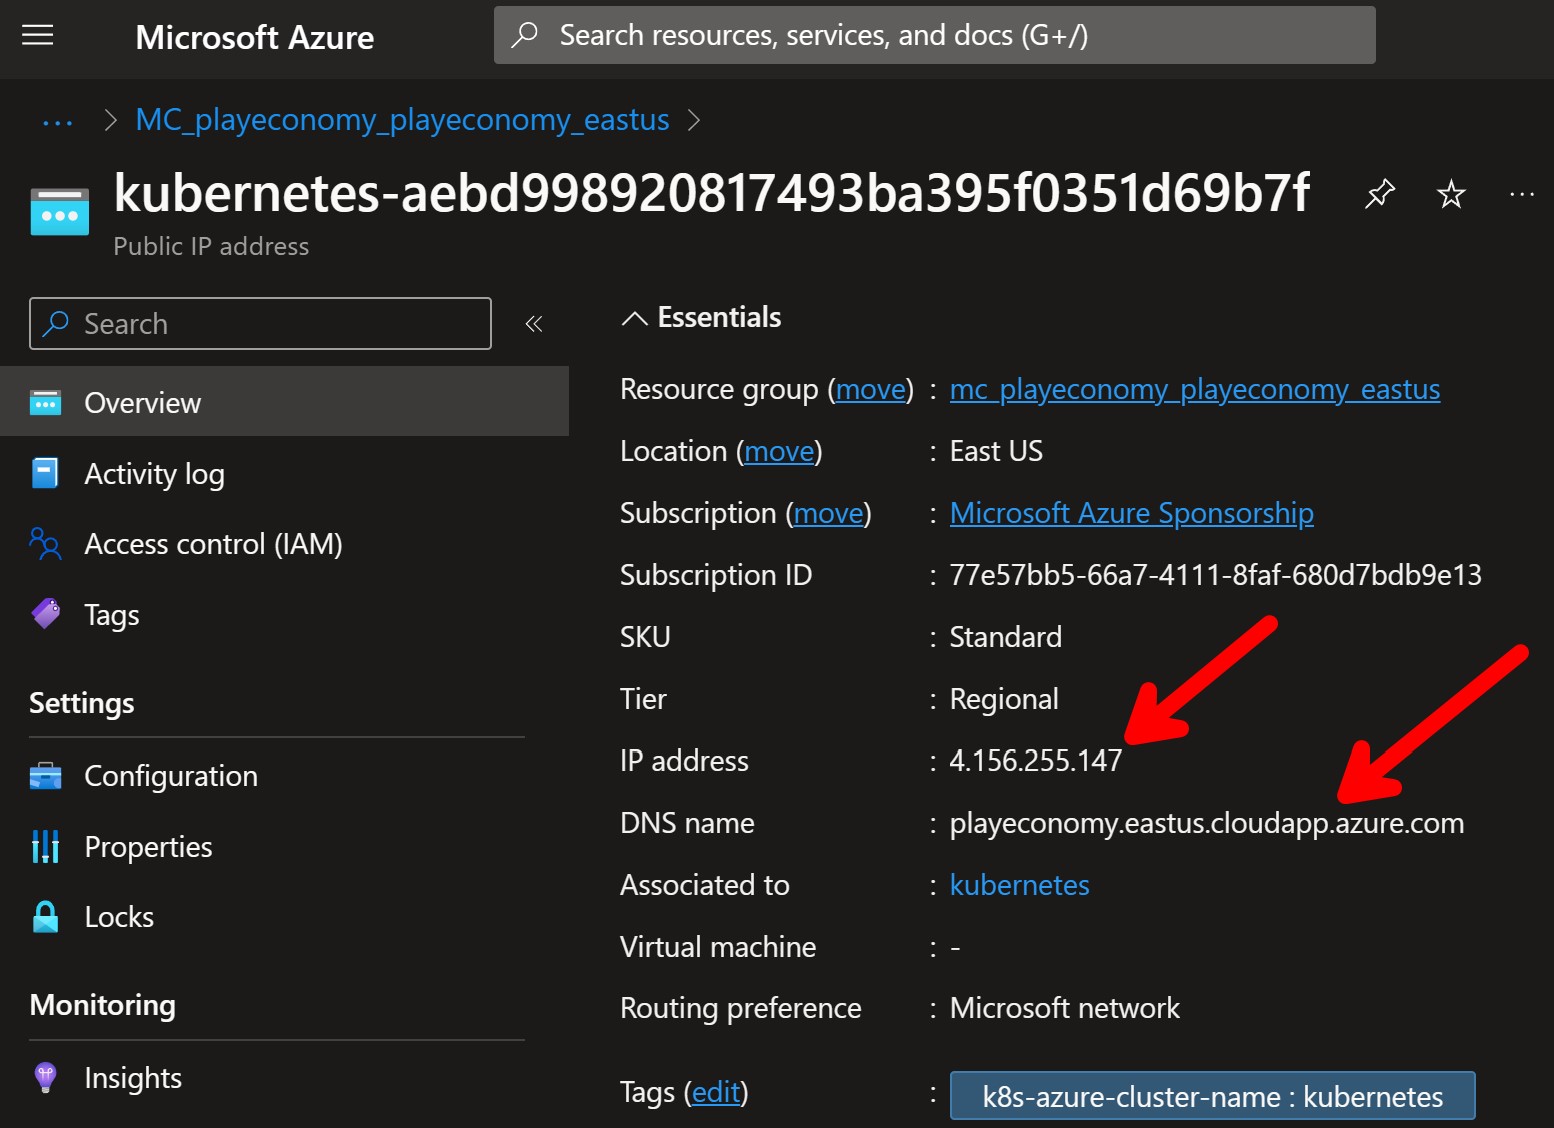
That’s your API Gateway public address, which your clients can now use to access your system from anywhere on the Internet.
Now let’s configure the routing rules.
Routing traffic from the edge
The first thing to do is to configure what Emissary-Ingress calls a Listener, which defines where, and how, Emissary-ingress should listen for requests from the network, and which Host definitions should be used to process those requests.
The listener, like all other Kubernetes resources, can be defined in a YAML file:
apiVersion: getambassador.io/v3alpha1
kind: Listener
metadata:
  name: https-listener
spec:
  port: 8443
  protocol: HTTPS
  securityModel: XFP
  hostBinding:
    namespace:
      from: SELF
This listener will listen on port 8443 for HTTPS traffic. However, that’s not the port that clients will use to access your system, but the internal port that the listener will use to receive incoming traffic from the load balancer.
XFP indicates that the X-Forwarded-Proto header will be used to determine if the request is secure and SELF means that the listener will only be associated with hosts in the same namespace where it is defined.
Talking about hosts, here is how you can define your host, which defines how Emissary-ingress will be visible to the outside world:
apiVersion: getambassador.io/v3alpha1
kind: Host
metadata:
  name: playeconomy-host
spec:
  hostname: playeconomy.eastus.cloudapp.azure.com
  acmeProvider:
    email: [email protected]
  tlsSecret:
    name: playeconomy-tls
The main things there are the hostname, which is the public DNS name that clients can use to access your system, and the tlsSecret, which is the name of the Kubernetes secret that contains the SSL certificate for that domain.
The steps to provision that SSL certificate are too much to cover in this article, but you can get all the details in the Cert-Manager documentation documentation or in my microservices program.
Now run these in your terminal to apply both resources to your cluster
kubectl apply -f .\listener.yaml -n emissary
kubectl apply -f .\host.yaml -n emissary
One more step missing, which is our mappings.
Define the mappings
In Emissary-Ingress, a Mapping is a resource that defines how incoming requests should be routed to the appropriate microservice.
For instance, if I want to route all requests sent to https://playeconomy.eastus.cloudapp.azure.com/catalog-svc into my Catalog microservice, which is in the catalog namespace, I would define a mapping like this:
apiVersion: getambassador.io/v3alpha1
kind: Mapping
metadata:
  name: catalog-mapping
spec:
  hostname: playeconomy.eastus.cloudapp.azure.com
  prefix: /catalog-svc/
  service: catalog-service.catalog
Notice that the service used there is the Kubernetes service that points to the Catalog service pods.
It’s that simple.
You would do the same type of mapping for all the microservices in your system, and then deploy the mappings:
kubectl apply -f .\mappings.yaml -n emissary
Now my clients can get all the Catalog items from my system by sending this GET request from anywhere on the Internet:
GET https://playeconomy.eastus.cloudapp.azure.com/catalog-svc/items
Which will send back something like this:
[
    {
        "id": "5dcff59a-b75b-446b-9e74-9c3beceb11f8",
        "name": "Potion",
        "description": "Restores a small amount of HP",
        "price": 5
    },
    {
        "id": "2902ff71-7ec6-4554-a76e-a91628af053b",
        "name": "Ether",
        "description": "Restores a small amount of MP",
        "price": 9
    },
    {
        "id": "227ba904-d70f-4ee1-853b-640ef2203e4d",
        "name": "Antidote",
        "description": "Cures poison",
        "price": 7
    }
]
Mission accomplished.
Whenever you’re ready, there are 3 ways I can help you:
-
Building Microservices With .NET: The only .NET backend development training program that you need to become a Senior .NET Backend Engineer.
-
ASP.NET Core Full Stack Bundle: A carefully crafted package to kickstart your career as an ASP.NET Core Full Stack Developer, step by step.
-
Promote yourself to 15,000+ subscribers by sponsoring this newsletter.